Steal this augmented reality app, make it your own, and share it with the world.
Augmented reality (AR) is an experiential medium—location-aware, time-based, and interactive. Learn to build your own interactive AR app in minutes using Torch templates. To help you test ideas quickly, we created a series of templates that give you access to slick layouts and common animations. You can customize these template projects with your own branded assets.
Whether you’re making AR apps for your portfolio, a business, or something fun to show friends, when you finish this tutorial you’ll have a personalized AR app that you can share anywhere—no prior AR experience needed.
This tutorial will show you how to start a new project from a template, personalize the scene with your own assets, and share an interactive AR app that animates your logo based on user movements in a 3D space.
To follow along, make sure you download the most recent version of Torch AR.
Step 1: Start a new project from a template
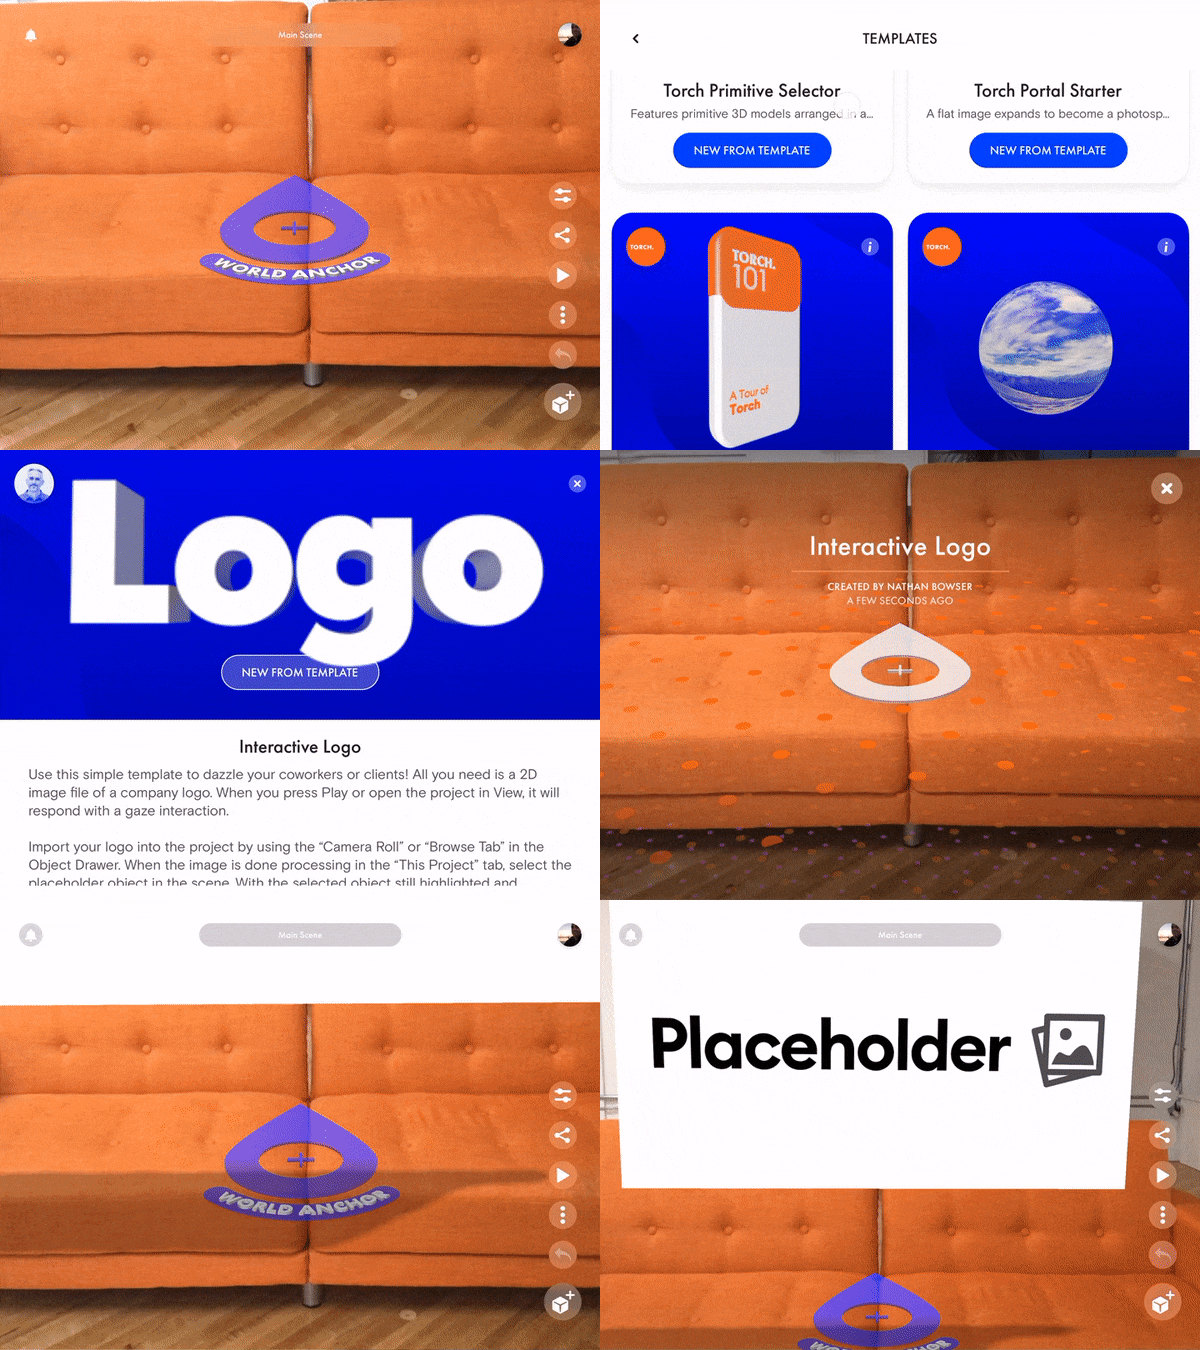
Torch templates are found in the Profile Settings menu— accessed by tapping your avatar, located on the top right of the screen. There are several templates to choose from and we regularly add new templates to the library. For this example, we will use the “Interactive Logo” template. Launch the Torch app from your iPhone or iPad to get started.
- Tap your avatar to open the Profile/Settings menu, then select Templates.
- Scroll down to the Interactive Logo template. To see the full template details, tap the “i” for more information.
- Tap New From Template to create a new Torch project with all the models, scenes, and interactions from a sample concept. Once you’ve made a new project from the template, it’s all yours—personalize and customize it all you like.
- Place the World Anchor. The anchor sets the center point for your app and the objects in the experience. Scan an evenly lit space until Torch identifies a plane, then tap anywhere to place the anchor. *Don’t worry, you can change this later.
Once you have placed the anchor, the template assets will begin to load. On your screen, you will see a looping video, that shows how to replace the “Placeholder” logo with an asset from the Object Drawer. I’ll explain these steps in detail next.
Step 2: Customize with your logo
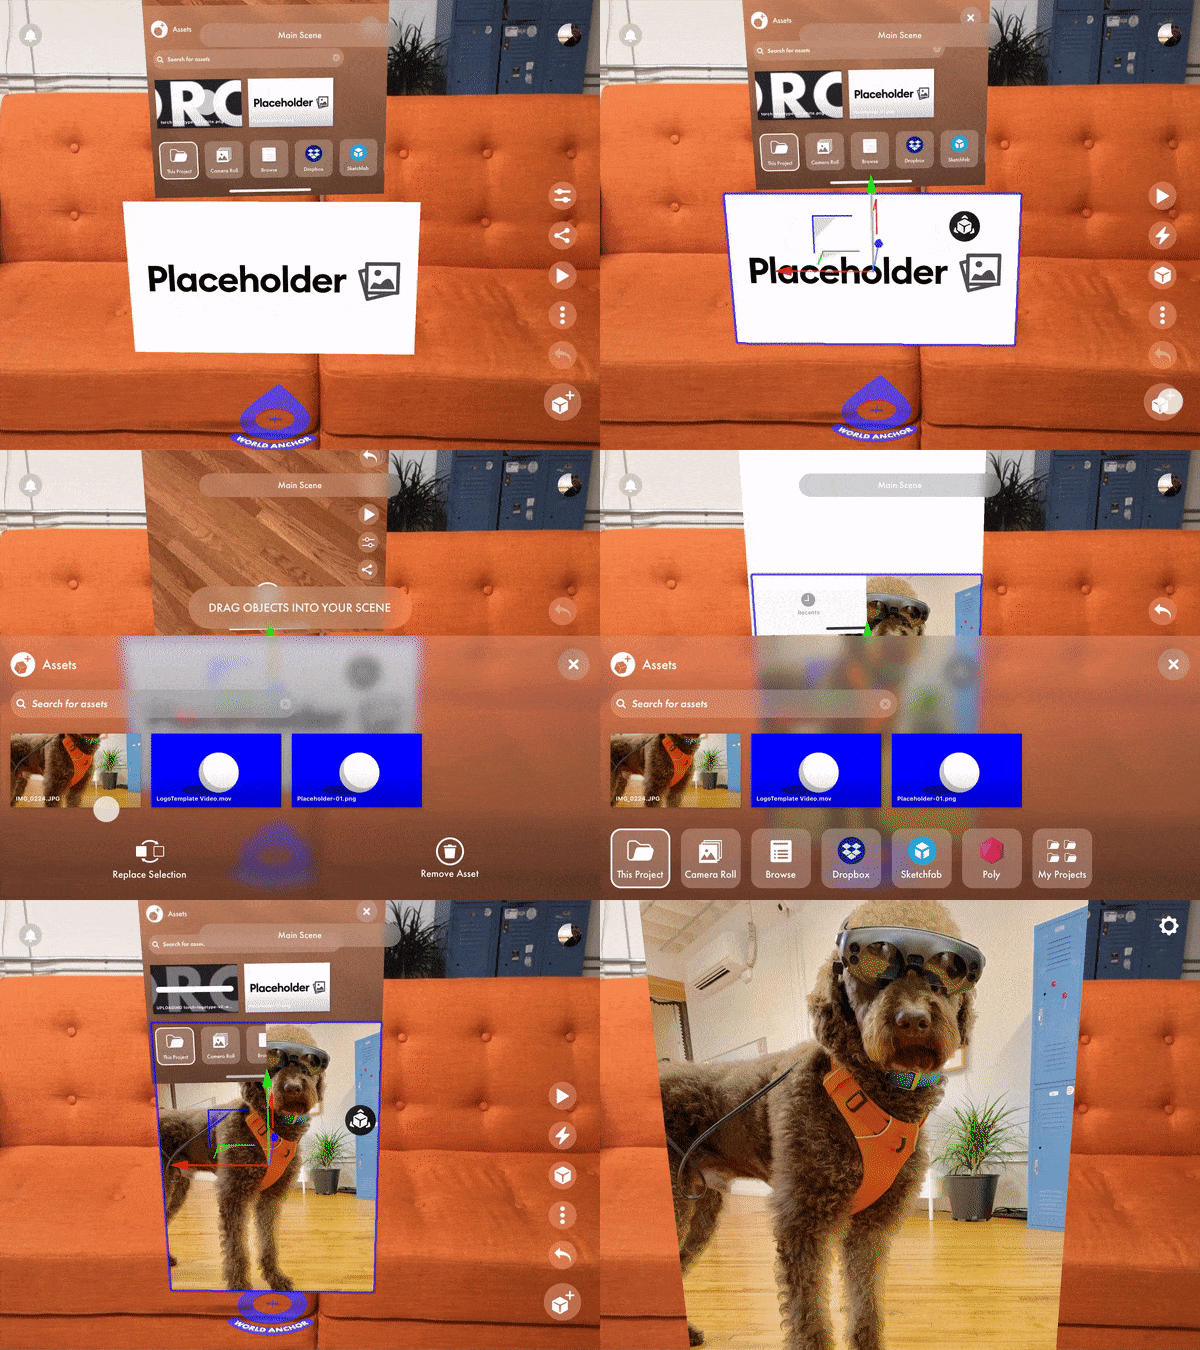
Now, let’s personalize this template into an app you’ll be proud to share. To do this, we’ll replace the Placeholder image with your brand logo. If you don't have a logo, I recommend you use a picture of a cute dog. Obviously, I'll be using this sweet pic of Doug in MR.
- Prepare your content. Use Airdrop to upload your logo image to your Torch device’s camera roll. Or, take a picture of the nearest dog with your device’s camera
- Open Torch.
- Tap the Object Drawer button located on the right-hand side of the screen at the bottom of the context menu.
- Tap Camera Roll. Then search for the image you want to upload. Select the image and tap Done at the top. Wait until the logo finishes loading in the asset bar.
- Tap the Placeholder logo displayed in the scene. The colored outline shows this object has been selected and is the target of our next step.
- Long press on your logo file in the asset drawer and drag it down onto the Replace Selection button. The colored selection outline around the Placeholder will turn red as you drag the new logo over Replace Selection.
- Release your finger over Replace Asset and watch the magic happen.
- Close the Object drawer. Tap the “X” in the upper right corner of the Object drawer.
While these steps replace the Placeholder image in the scene, all of the interactions and animations attached to the placeholder are now assigned to your logo—sweet. Now, let’s test those interactions.
Pro Tip: In addition to using the camera roll to import custom assets, you can also browse your device’s file folders, or use integrations with Sketchfab and Dropbox to manage and upload your custom creative. Learn more about uploading and managing assets in these help docs.
Step 3: Test your app
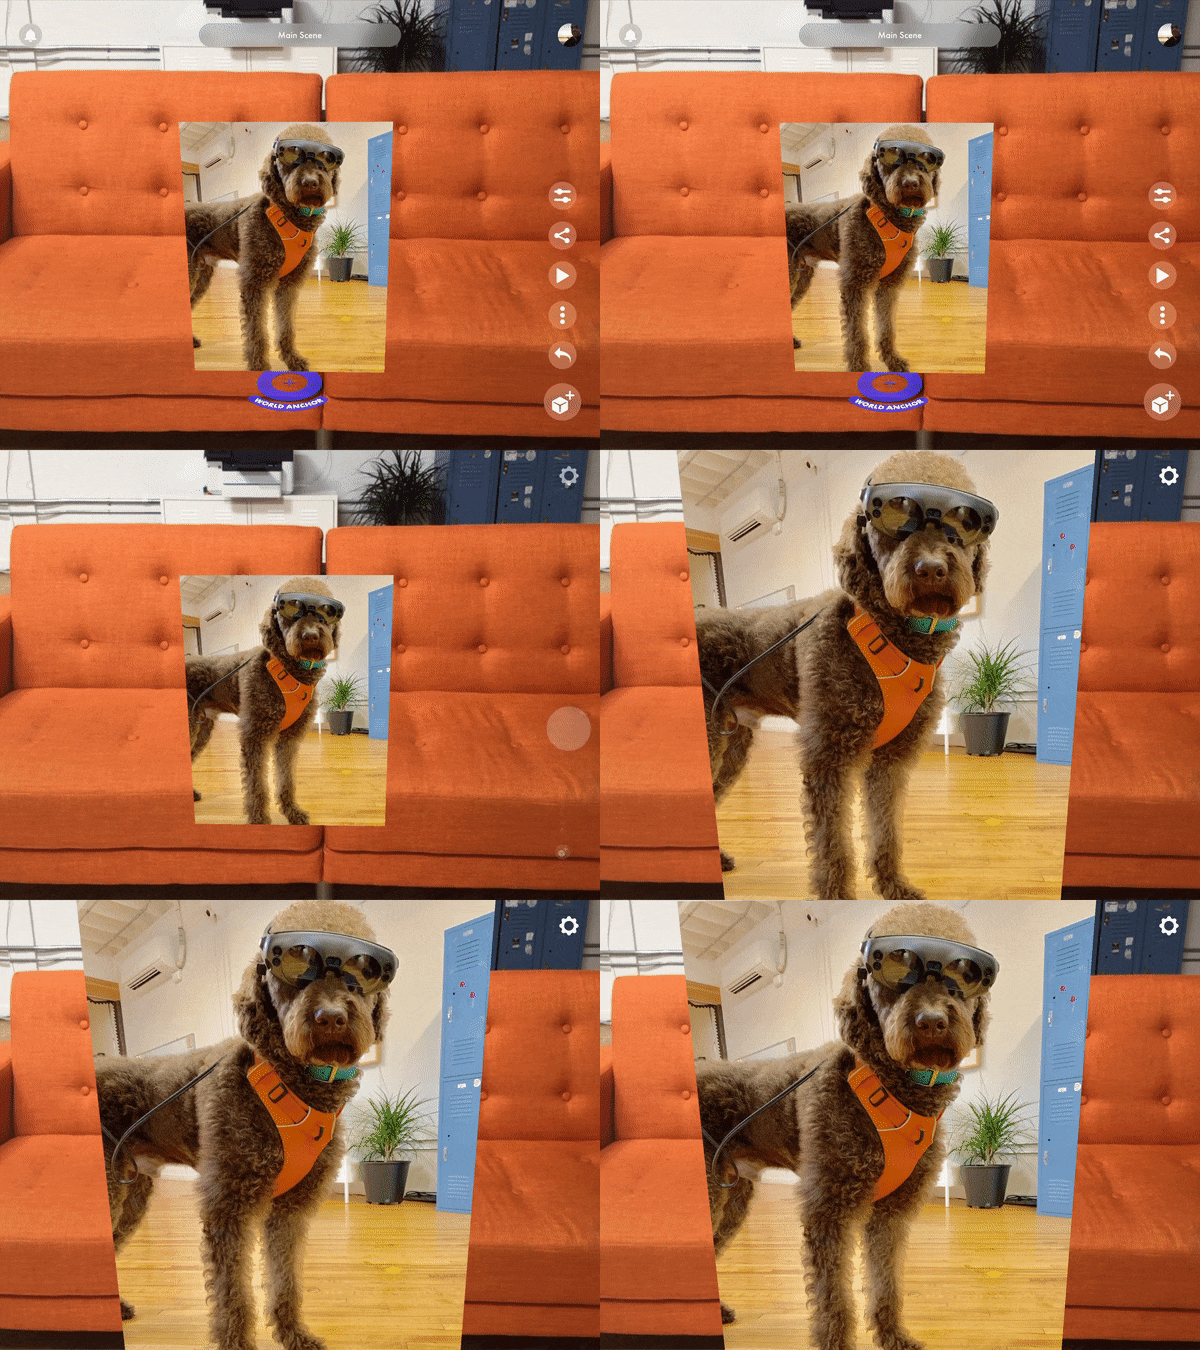
Now let’s enter Viewer Mode and test out this template. Our app uses a Gaze At interaction that makes the logo grow in size when a device “looks at” it. Play around and experience what happens when you gaze at and then gaze away from your logo.
- Tap the Viewer Mode icon, the triangle in the right-hand context menu.
- Set your anchor. Find a well-lit area and tap to set your anchor.
- Explore. Move around your app—view it from every angle. What happens when you anchor the app on the floor or a table? Does the experience change as you get closer or farther away?
- Tap the gear icon to access a menu of Viewer Mode options including replay the app, reset the project anchor, and exit back to the design environment.
Step 4: Clean up the scene
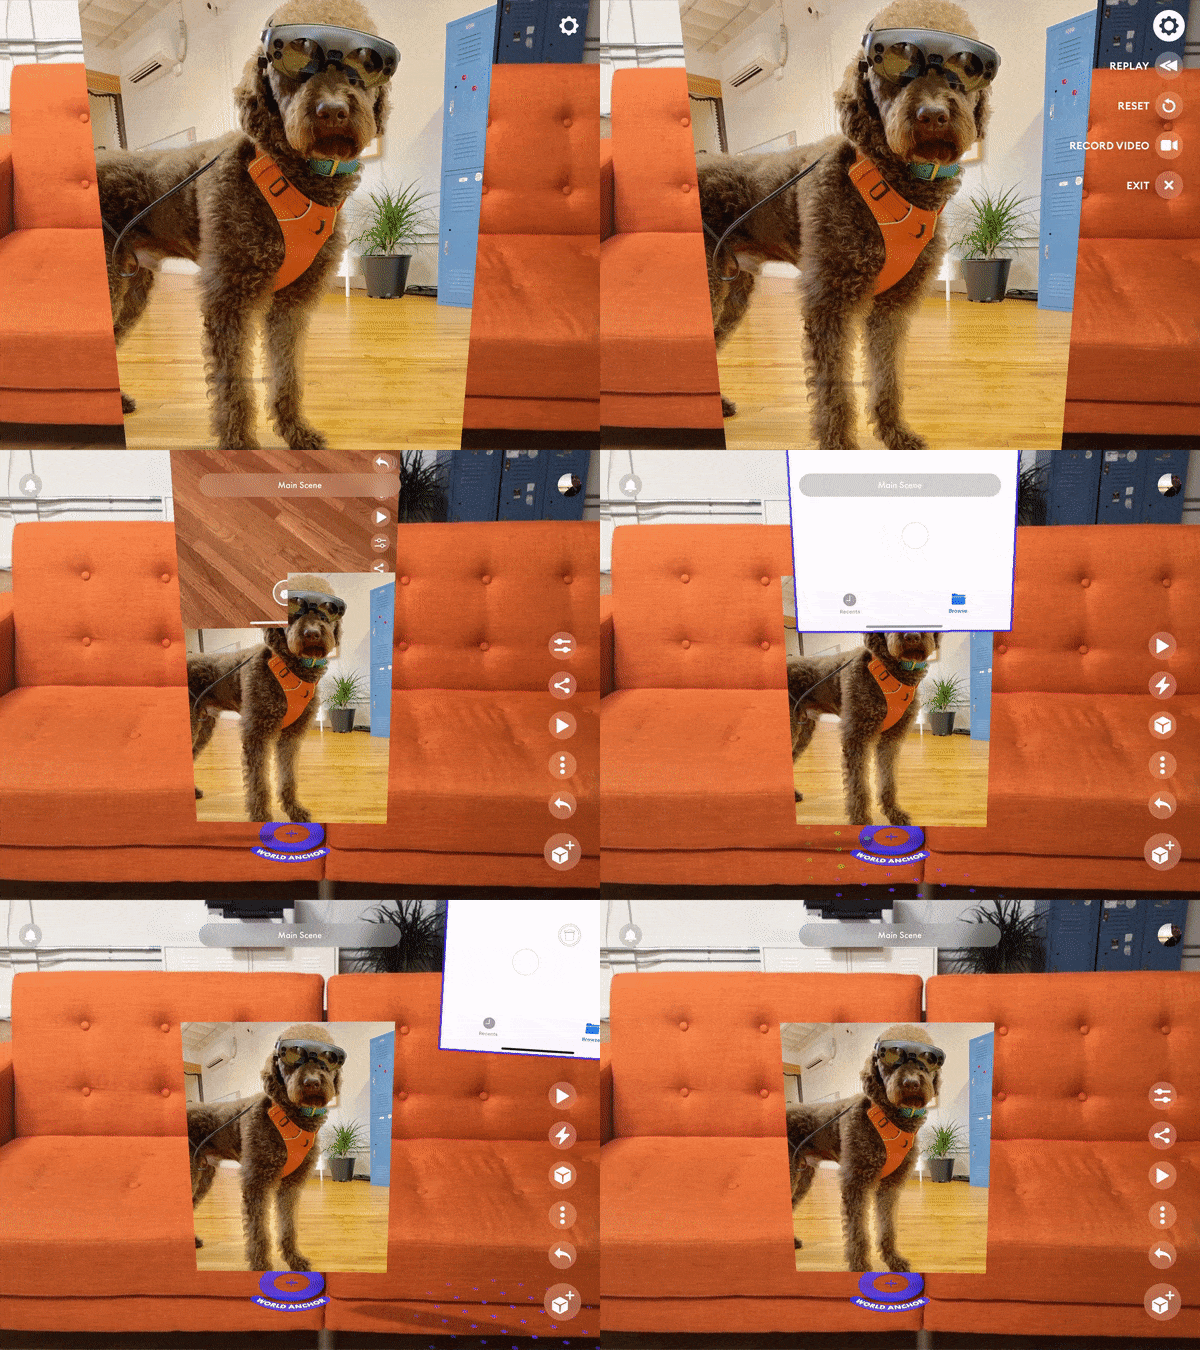
Now that we’ve tested our interactions and everything is working nicely, let’s tidy up our app and delete the tutorial GIF from the scene. Even though the GIF magically hides from view when you open this App in Viewer Mode, using an Enter Scene interaction, let’s practice some good design hygiene and clean up this app.
- Tap on the GIF to select it.
- Drag the model to the top right corner. The trash icon appears in the upper right as you begin dragging the video to the right.
- Release your finger over the trash target. As you finger nears the trash can, a magenta target expands around the icon. Release your finger when it touches this target to delete the selected assets.
Pro Tip: You can undo any change by using the Undo arrow in the Context Menu, on the right. Undo and redo arrows in Torch work like most apps, but the redo button will only appear after you undo any action.
Step 5: Customize the interactions

You can quickly edit an interaction in Torch to respond to a new trigger event, like proximity to your device, gaze, or a tap selection. Now I’ll show you how to edit the Gaze At animation to trigger so our logo grows when we get close to it, instead of when we look at it.
- Tap on the logo to expose the interactions icon, the thunderbolt, in the context menu.
- Tap on Interactions to view all the AR animations attached to this object. You can also, modify, delete, or add existing interactions from here.
- Select the “Scale Up on Gaze” interaction. Notice that the Gaze At trigger is highlighted.
- Tap Enter Proximity in the Object Trigger row. This interaction triggers when we enter within a defined distance to the object. On smaller devices, you’ll need to scroll through the Object Trigger row to view all your trigger options.
- Change the Proximity Distance to one meter, you will see the object’s proximity radius indicated by a blue sphere around your asset. Now, when a user walks closer the logo will grow in size as a response.
- Tap the Check Icon to confirm your settings.
- Change the Gaze Away interaction to an Exit Proximity trigger. Using the same steps as Enter Proximity, change the Gaze Away interaction to an Exit Proximity trigger with a radius of one meter.
- Rename the interaction “Scale-Up on Proximity.” Labeling the interactions helps you unpack and recreate this process later.
- Test your changes. Exit the interactions menu and head over to Viewer Mode to test your changes. Walk close to the logo and it should grow, take a step back, and the image shrinks.
Pro Tips:
- Interactions are only available when a single object is selected. If the interactions icon is not visible in the context menu, either you have no object selected, or you have multiple objects selected.
- If you need to delete an interaction completely, select it in the Object Interaction menu and swipe it left across the screen, then tap Delete.
Step 6: Share your AR app
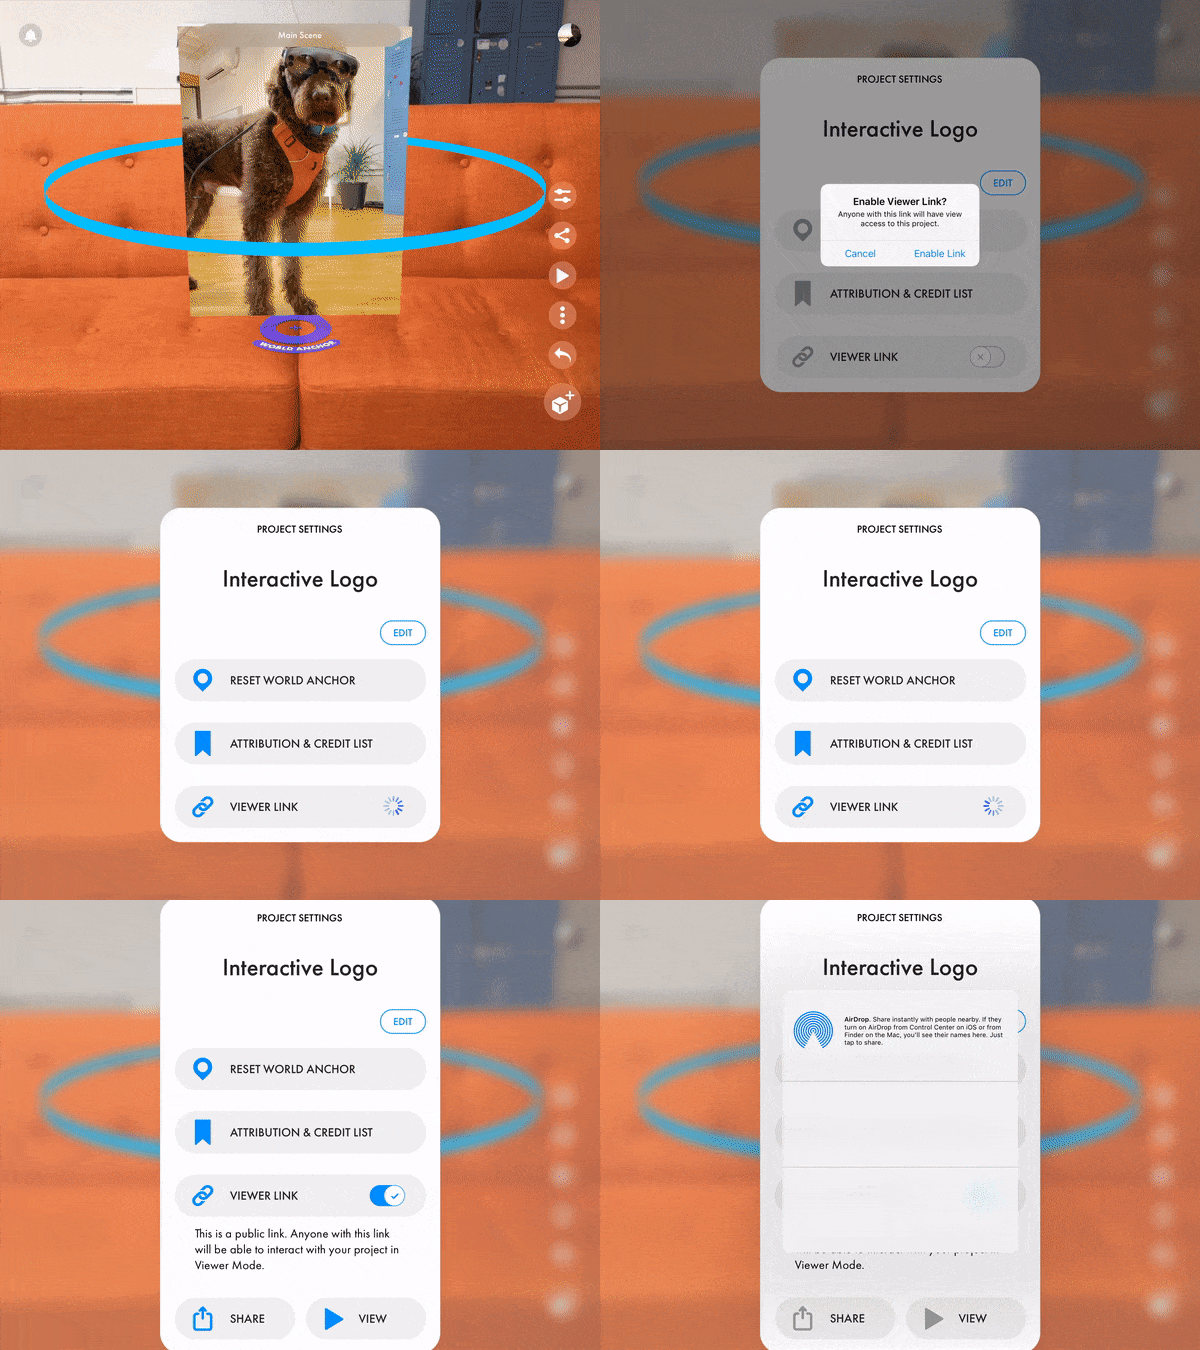
Now that you’ve created your AR app it’s time to show it to the world. With Torch Viewer links, you can share your app anywhere. Email your friends QR codes to scan, or share a deep link that opens your app directly in Viewer Mode on any ARKit device.
- Tap the Project Settings button—the top button in the right-hand context menu.
- Select the Viewer Link tab. Confirm you want to enable this project’s Viewer Link.
- Tap Share and send your app into the world.
Pro tip: Learn more about sharing AR with Torch Viewer Links.
Nice work! Now you have an interactive app that highlights your brand logo (or dog) in a shareable, playable, augmented reality scene. We’ll be sharing more new templates with helpful spatial layouts and stackable micro-interactions. If you ask nicely, we even take requests.
Open Torch and build an app today!
--
About the Author
Jake is a copywriter with a background in creative agency work.


