


In augmented reality (AR) apps, interactive animations guide viewers through experiences–transitioning them from scene to scene while adding polished timings and nuances to the AR experience.
In this tutorial, we'll show you how to use interaction triggers and responses to move and scale 3D objects, how to link scenes for seamless transitions, and how to build complex interactions from simple components and patterns. Additionally, you’ll understand how a scene change in the background can deliver the viewer into a fresh scene with new interactive elements.
We'll be using our embedded AR Hotel Reservations app as an example. In this app, users link from a screen-based hotel reservation system to an AR experience that goes beyond pictures. They'll visualize prospective hotels in space and see physical models of available rooms. They'll even dive down into a world-scale version of each room before making a choice.
To follow along with these instructions, the first thing you’ll need to do is download the most recent version of Torch AR. Got it? Great, now let's get started.
Step 1: Start building the Select interaction

In Torch, interactions are built from a recipe of triggers (an event that starts the interaction), targets (the object(s) that react to the trigger), and responses (what the targets do when they react). You can read more about interactions in our help docs.
For this tutorial, we’ll get started building the interaction that is triggered when the customer taps on one of the hotels. This interaction will make all the hotel information cards disappear from view.
To start this Select Interaction, we’ll first use the visibility property to hide any models that aren’t used in the next scene. As we go, we’ll build on the following simple pattern to create a complex animation:
- Select the object that will trigger your interaction. Then tap the Interactions icon (the lightning bolt) in the context menu. The Object Interactions drawer opens and a list of all interactions for the selected object will appear.
- Add and name the interaction. The Trigger & Responses view opens. Tap the interaction name pill and name the interaction.
- Set a trigger event for your interaction. The Select Object trigger is selected by default in new interactions, and that’s what we want for this interaction. Tap the trigger to adjust its settings.
- Chose the interaction response. First, tap any of the objects that will respond to the trigger. The object properties drawer is now displayed. From here, adjust the response for the selected object, or tap any additional objects in the scene that will share the same response to the interaction trigger.
- Change the visibility properties. With your interaction targets selected, tap the Visibility property button, choose Invisible and remember to tap the check mark in the lower-right corner to confirm your settings.
- Test the interaction in Play Mode. Tap the Play Mode button, the triangle, in the context menu. When in Play Mode, test your animations by tapping (selecting) the object with the new interaction. For best results, it’s important to build Torch interactions incrementally and to test frequently
And now, a pro tip about scenes
At their most basic, scenes act like artboards, visually organizing your app into groups of 2D and 3D objects. But, the hidden power of scenes is their ability to layer and sequence the interaction rules and object properties that make your app truly interactive. When you begin to learn to use scenes in this way, each new scene created holds unlimited possibility.
Consider, the same object can appear in the same location in multiple scenes, but it doesn’t need to have the same properties or interaction logic behind it. This means a scene switch can both advance the narrative of the experience you create, as well as act as a keyframe that changes the behavior, animation, or state of that object. This leads to more complex and rich animation and interactivity in your apps. The following process will help you practice this strategy:
- Pick a scene to use as the start-state of the interaction. Make a copy of it using the Scene Options drawer—we’ll use this copy as the end-state for the interaction.
- In the scene copy, pick an object, and use free-form manipulation to move and scale it. We’ll use these specific coordinates & dimensions to set the interaction in the first scene.
- Jumping back to the first scene, create an interaction on some other object, and enter the property values from the end-state scene to perfectly position the target variables for the object you manipulated.
- Once the two scenes are set up as the start & end states, we can attach them with a scene change in the interaction. Because the start state in the second scene is the same as the end state of the interaction in the first scene, there will be a seamless link between the two. If you’ve done this correctly, you will not even notice the scene change!
This method can be applied to any property, in any combination, to create seamless transitions between scenes—every time. In time, you’ll be a pro at supercharging your projects with complex, layered interactions. Let’s give it a shot.
Step 2: Add the Scaling response
For this next step, we are going to inspect the details in our end-state scene to capture the precise scale values we need to match in our interaction. As shown in the video, in our second scene, we have a much larger version of the hotel we want to focus in on.
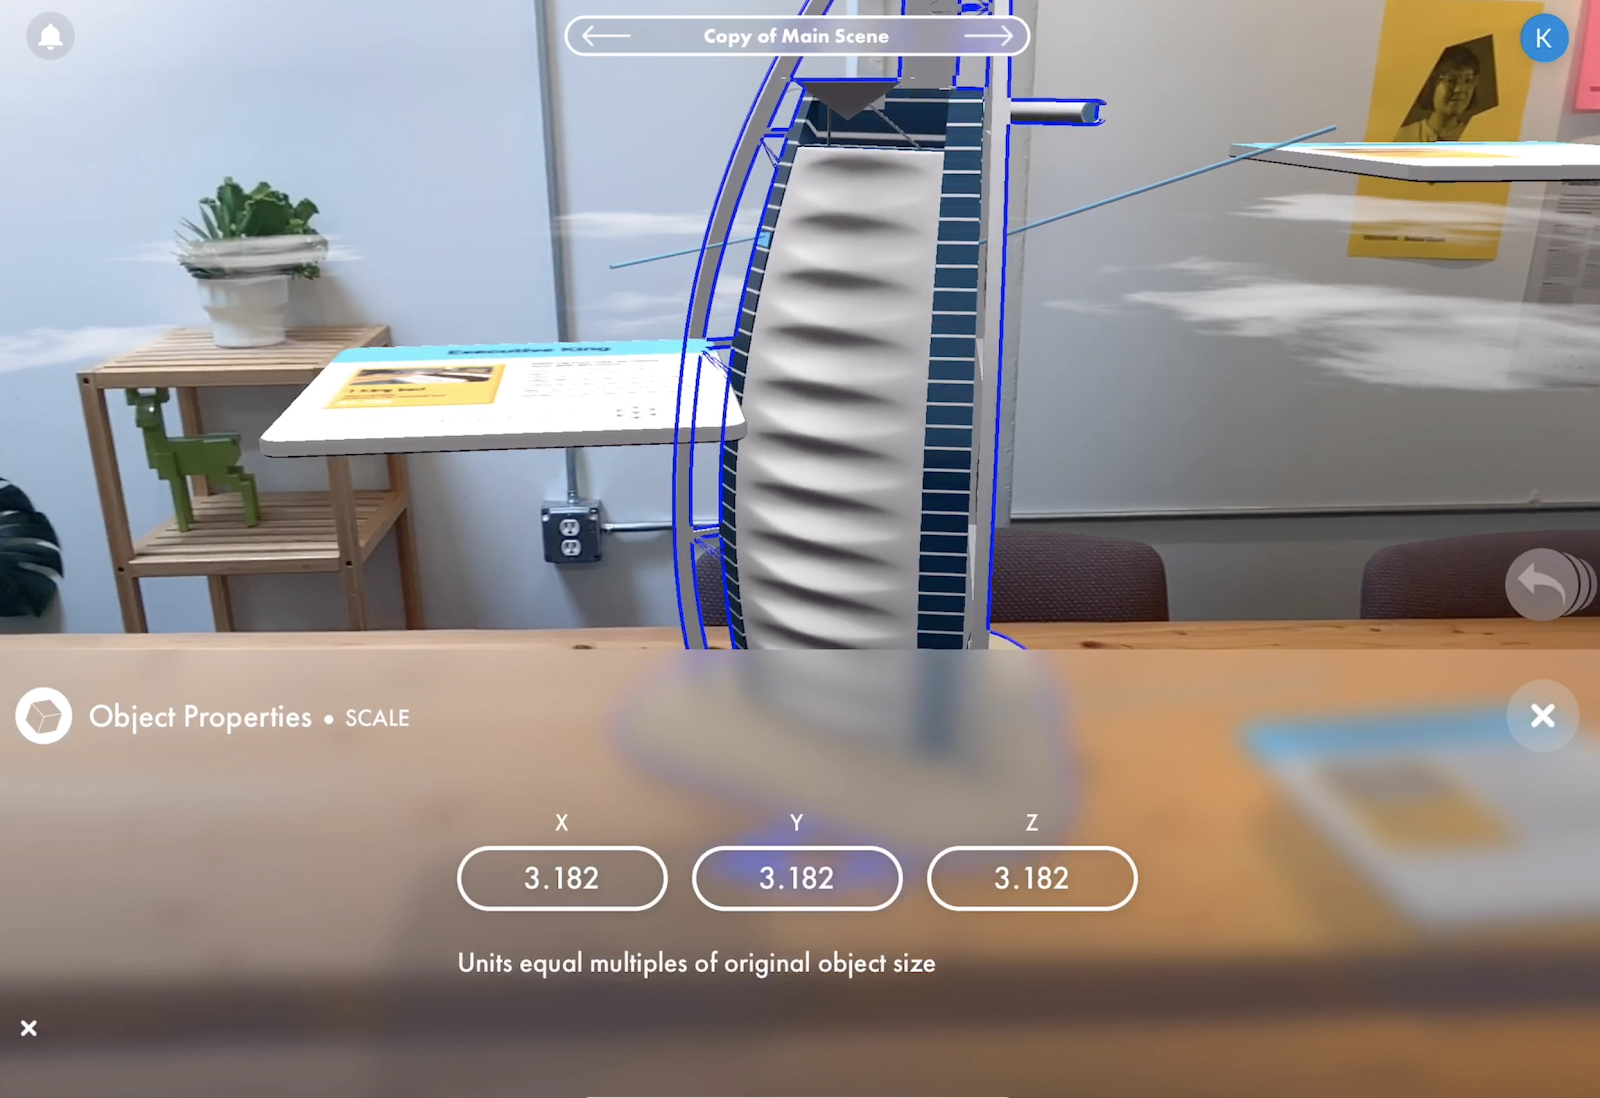
By tapping the hotel and then Object Properties, we can see that the model in the second scene is scaled 3.182 times in each dimension–this model was scaled uniformly. Here are the steps we can take to set up the scale interaction that will take us into this scene:
- Copy the scale variables from the end-state and move back to the starting scene.
- Open the “Select 1” interaction in the first scene. Tap the hotel information card, then the Interactions icon, and then the interaction labeled “Select 1.”
- Edit the Scale response. Select the hotel model and then tap the Scale response to enter the scale variables, 3.182, we saved from the end-state scene.
- Test the interaction in Play Mode. A quick trip into Play Mode shows us that our scale interaction is working as we expect, but the vertical position needs an adjustment.
Step 3: Adjust the hotel position

Using the same pattern, we’ll document the hotel position coordinates from the end-state scene and use them to set the interaction response for the hotel model. Jumping back to the end-state scene, we’ll proceed like this:
- Copy the hotel’s position values from the end-state. Know that this object only needs to move up along the “Y” axis, so this is the only value we will need to capture. Now, move back to the first scene.
- Open the “Select 1” interaction. Tap the hotel information card, then the Interactions icon, and then the interaction labeled “Select 1.”
- Edit the position response. Select the hotel model and then tap the Scale response to enter the Y coordinates, 0.7021.
- Double Check! Make sure to select Absolute position. Absolute positions anchor an object to specific coordinates, which is what we want. A cumulative position will change by the same ratios each time the interaction is triggered.
- Test the interaction in Play Mode. Since we’re building an additive animation with Torch interactions, we can save a lot of effort and frustration by testing these animations as we add each interaction response.
- Repeat these steps for the cloud models. Including this one decorative element from the earlier scene maintains a feeling of immersion as shoppers move through the app, without overwhelming or distracting them from their goal–booking a reservation.
And now, a pro tip about scene changes
In a Torch interaction, a scene change response is always the last thing to happen. This means that any animations, calls to external APIs, and other responses will all happen before moving to the scene designated in the scene change response.
Once that scene change happens in a Torch project, you have another powerful tool at your fingertips—the Enter Scene trigger. By adding an interaction on the scene itself, you can use an Enter Scene trigger to immediately kick off new animation and interactivity when landing in any scene.
The combination of the Scene Change response and Enter Scene triggers unlocks yet another level of depth in your Torch projects.
Step 4: Add the Scene Change response
Let’s confirm that the blocking we’ve set up for the hotel animation is really hitting its target by linking our two scenes by adding a Scene Change response to this interaction.
We’ll use a similar pattern to assemble this response, but we’ll also open up a new part of the interactions drawer to add this animation:
- Open the “Select 1” interaction. In the first scene, tap the hotel information card, then the Interactions icon, and then the interaction labeled “Select 1.”
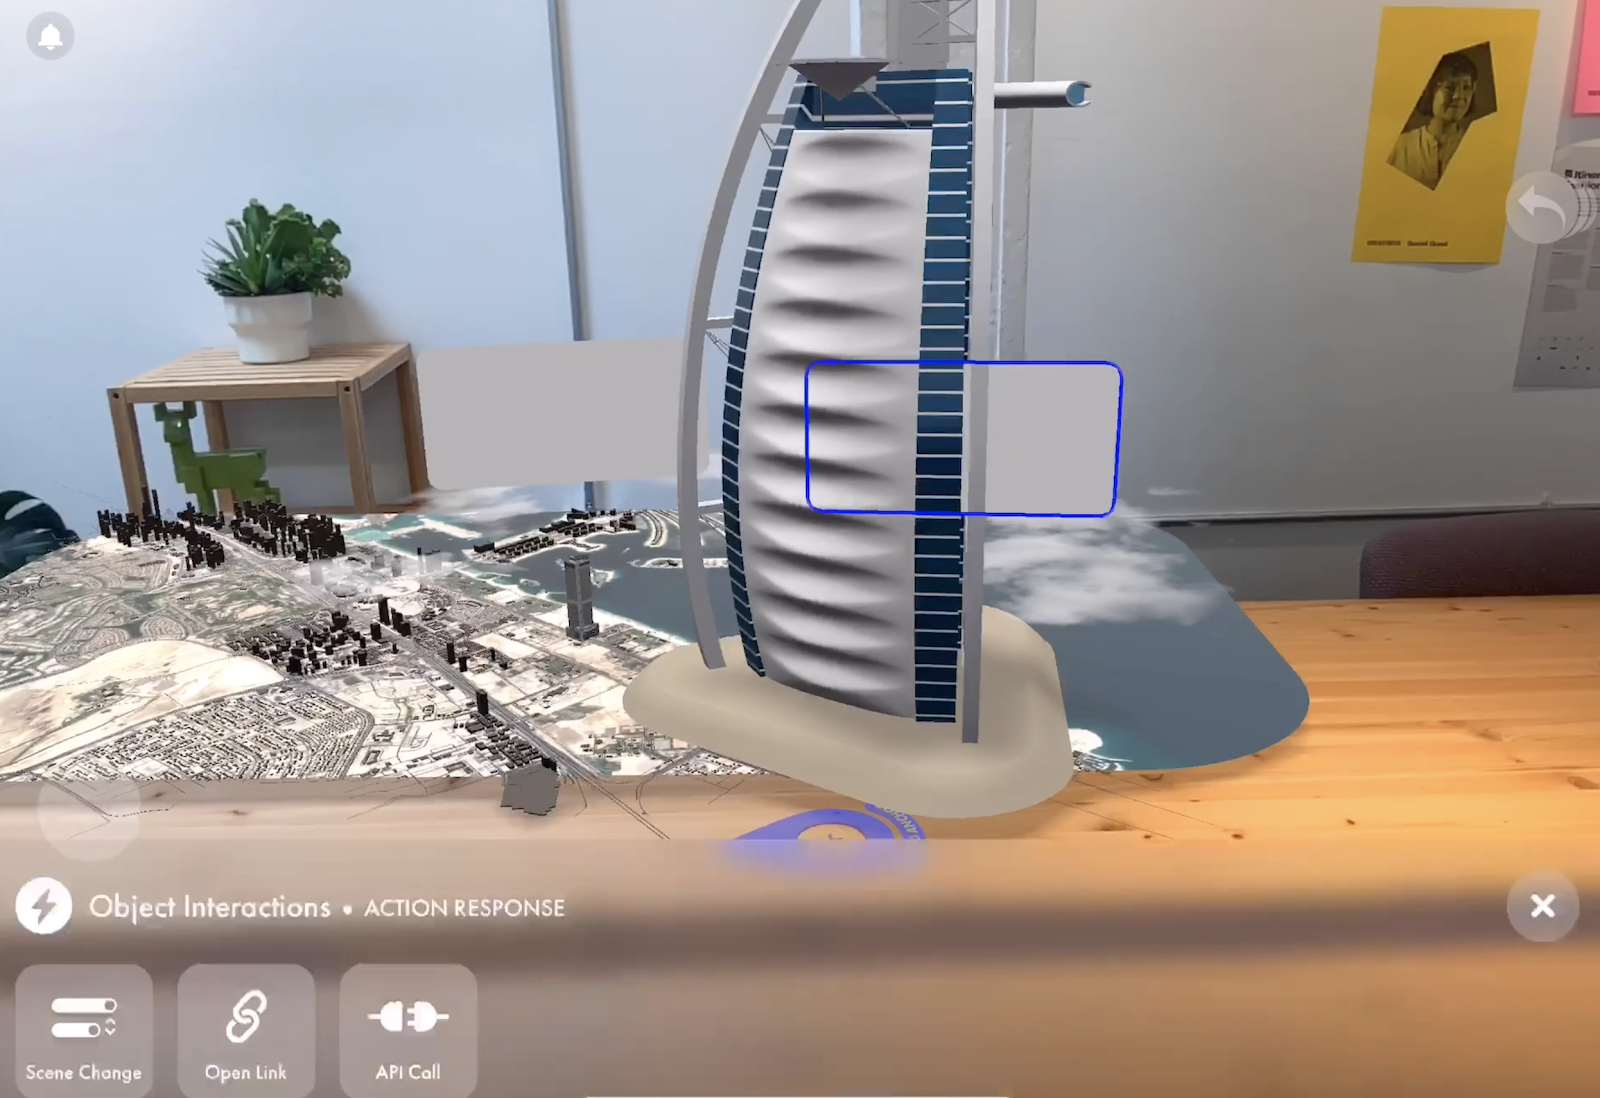
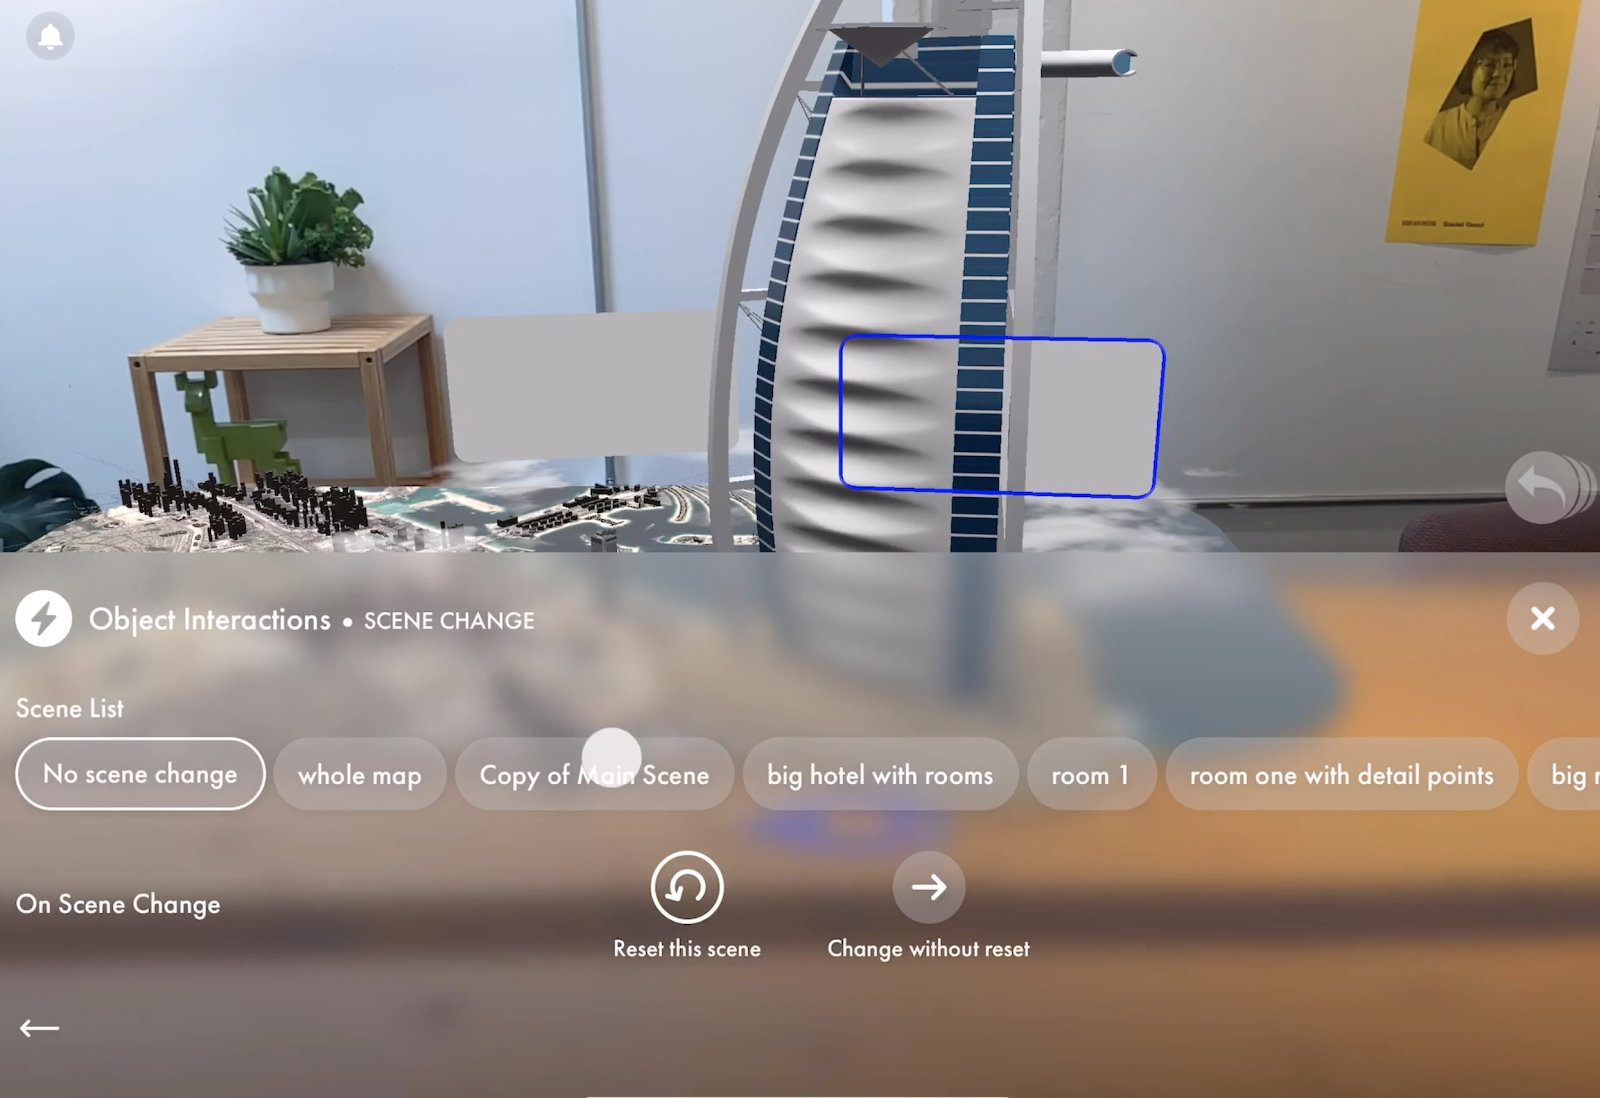
- Select Action Response. Instead of selecting any models, tap Action Response to reveal three new responses that can move you between Torch scenes, into other apps or webpages, or connect your app with an APIs. Tapping the Scene Change response opens a list of scenes in your project.
- Choose the target scene. Tap to select your target scene and then “X” out of the interaction menu to test the scene change in Play Mode. Sweet! Just a few more steps to go.
- Test the interaction in Play Mode.
Step 5: Hide the map

The last step uses simple free-form manipulations to shrink and position our map model out of view since we won’t be using in the next scene. This simple animation helps transition to the new context and focus shoppers on their selection. To achieve this effect we’ll add a new response to our interaction that sweeps this map out of the way.
- Open the “Select 1” interaction. In the first scene, tap the hotel information card, then the Interactions icon, and then the interaction labeled “Select 1.”
- Select and scale the map. Tap the map and use a two-finger pinch to scale down the map.
- Move the map out of view. Just drag the map to its final position under the hotel model.
- Test the interaction in Play Mode.
Step 6: Adjust animation curves and speed
Now, with all the components of this interaction set up individually, let’s review the whole animation to make sure the end result delivers the experience we’ve designed. The animation we’ve set up moves too fast—we want visitors to notice and enjoy that smooth transition.
To adjust the timing, we need to edit the animation curves. In Torch, all interactions will start with a linear curve and default timing of .5 seconds, but you can customize these settings at any time by editing the interaction.
- Open the “Select 1” interaction. In the first scene, tap the hotel information card, then the Interactions icon, and then the interaction labeled “Select 1.
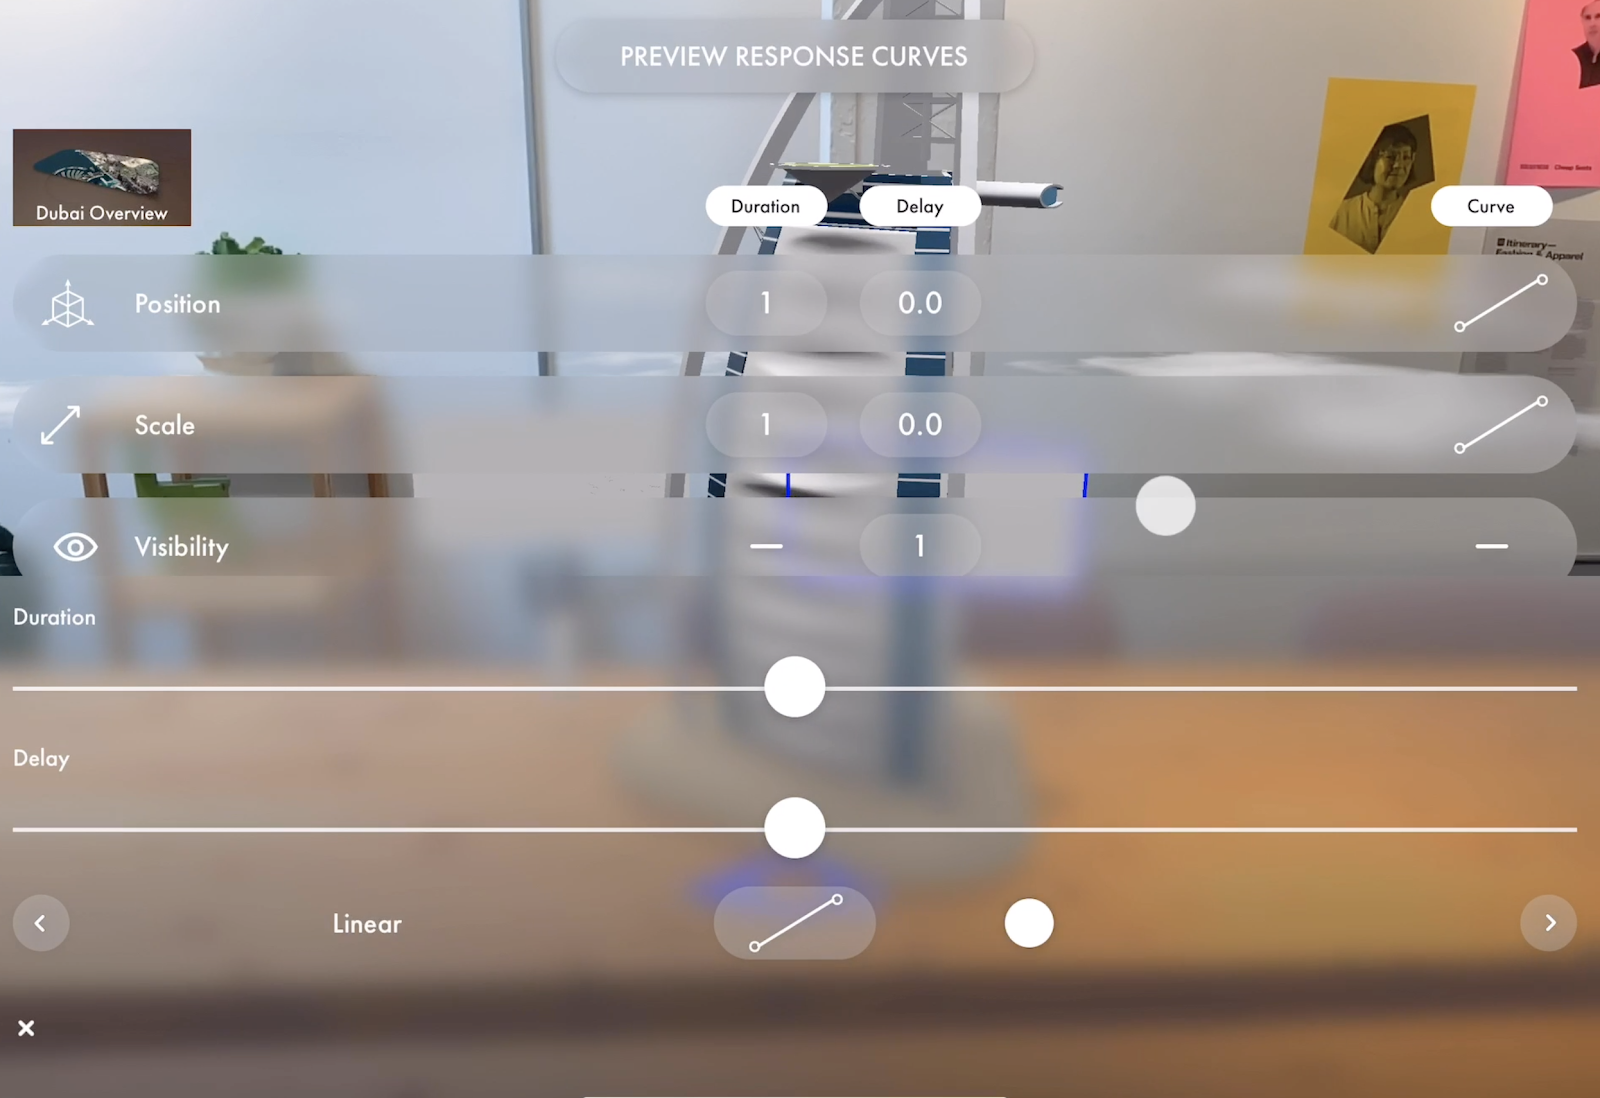
- Tap Edit Curves in the center of the interaction panel, under Interaction Responses. From the Preview Response Curves screen, you can view and edit every interaction response in this interaction group. From this view, you can edit the duration, delay, and curve type for each interaction response.
- (Optional) Play with the animation curves. To change the actual curve of the response animations, select one or more response cells, then toggle through the animation curves at the bottom of the screen.
- Set all durations to one second. Since I’ve tested these animations already, I know one second will work awesomely for all the components of this interaction group. Each project will be different, so make sure to test your curves for the optimal experience.
- Test the interaction in Play Mode. Take notes on what worked and make adjustments to the curves for each step in the interaction.
Now it’s your turn
Nice work! By layering small interaction components together, you can now create nuanced animations in AR. Use powerful scene change responses to transition users between scenes and create seamless immersion. I hope this workflow for building interactions in Torch helps you plan and develop the interactive elements in your next AR app. When you’ve got your animation timings set perfectly, make sure to share your project with the hashtag #BuiltWithTorch


