


Update #2: Torch AR is now available on the App Store.
Update: added link to folder with 2D resources and some additional advice on planning for movement suggested by the Google AR Design Guidelines.
Building an Immersive Prototype in 30 minutes
This is the first in an ongoing series of posts in which we will iterate on the Planetary Explorer project put together in about thirty minutes by Josh Faust, Torch CTO and co-founder, to test some of the newest features.
Since it took less than 30 minutes to build the prototype, it seems a bit like overkill to spend too much time writing about it, so I will keep this brief.
Step One: Planning
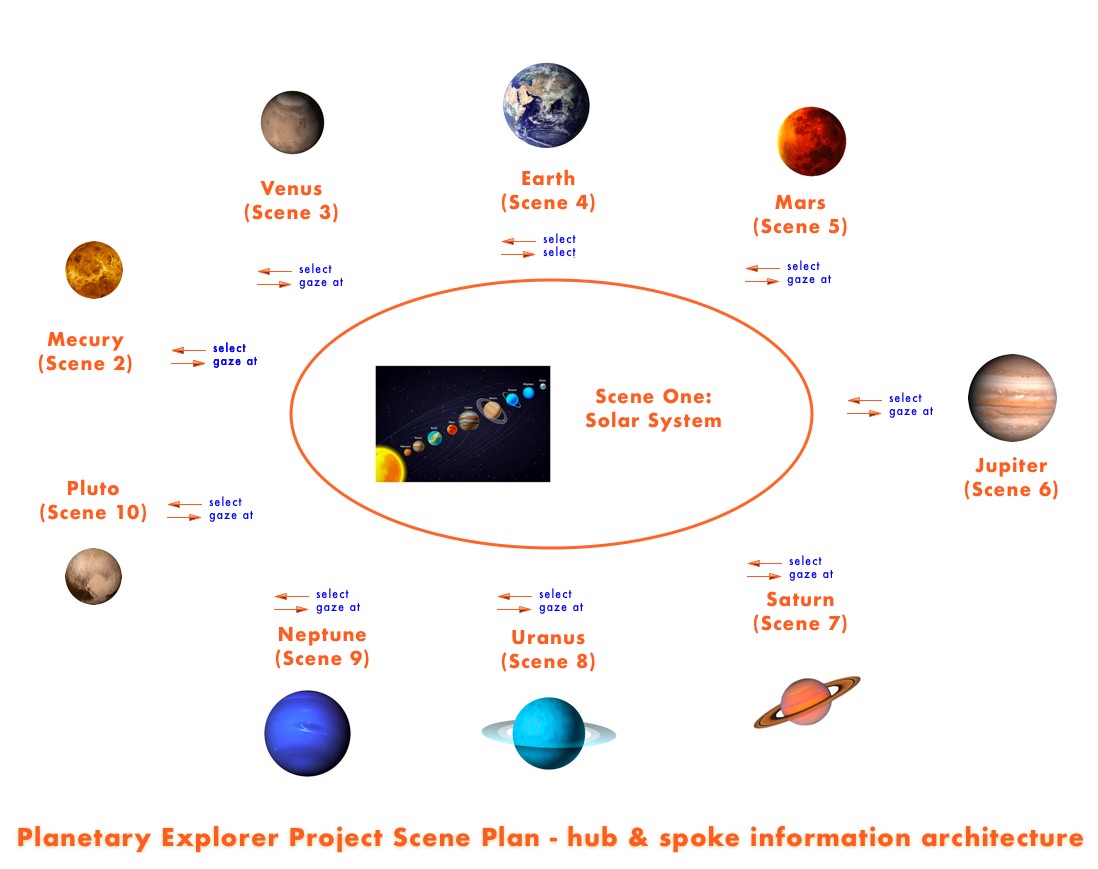
To get started building a project like this, it is good to take a moment to think about the information architecture (IA), which in this context refers to the desired flow from scene to scene.
- At Torch we’ve begun to catalog different IA types, of which Planetary Explorer is a pretty standard example of the the simple hub-and-spoke variety.
- Users start in a base scene (in this case, the solar system (scene 1) from which they navigate to other scenes (individual planets, scenes 2–10).
- The only navigation option in the individual planet scenes will be to loop back to the base scene.
- Environment: think about where want to build the prototype. From a storytelling perspective, especially if you are capturing video, space is important. If you want your user to interact with the models, consider how much movement you will require.
Step Two: Resources
- We collected the 2D resources you’ll need in this public directory. You’ll find the wiki pages for the planets, a few different Go Back UI elements, and a Project banner in this directory. You can copy them to your own cloud drive and access them through the Asset Drawer →Browse in the Torch app.
- You can find the nine planets (we are avowed Plutoists) plus the Sun by searching in Sketchfab.
Step Three: Building the Prototype
The recipe for building the prototype is simple:
- Create a project called Planetary Explore (tap the Main Menu to create projects).
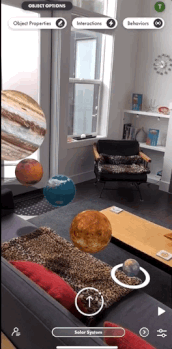
- In your base scene, which Josh named Solar System, search Sketchfab and Poly (from the Asset Drawer, bottom center) for models for all the planets. Josh forgot the Sun, an oversight we can forgive (and probably a subconscious response to Portland’s record-breaking summer heat).
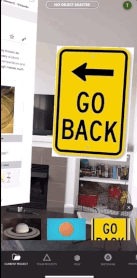
- Add 2D assets to your project. In this case Josh just used a screen grab of wikipedia pages and a perfectly suitable Go Back sign jpeg he found in a quick image search. 2D images are perfect for navigation UI in 3D.
- Add the Face Camera behavior to the Go Back sign since it is 2D and disappear at some angles. Select the Go Back sign, tap the Object pill ->Behaviors->Face Camera and select the Left/Right direction for the access of rotation.
- Arrange the planets the way you want them to appear. Josh opted for a line in order of distance from the sun. We are going to experiment with different arrangements in future iterations.
- Add Spin behaviors to each planet. Select the planet to which you want to add spin, tap the Object pill in the upper center of the screen, select Behavior->Spin>Left/Right and input the revolutions per second. Josh actually made the rotations proportional to the actually rate of revolution of the real planets. Wow!
- Now, add your second scene where users can explore Mercury. Tap the Scene pill in the bottom center of the screen, tap Add Scene, give the scene a name and brief description. Save your work. You’ll immediately find yourself in that scene, ready to design.
- Open your Current Project collection in the asset drawer and drag Mercury into place. You’ll need to add the spin behavior again for now. Next, add the Wikipedia page grab and the Go Back image.
- Add navigation that returns you to the main scene when you gaze directly at the Go Back image by selecting the Go Back image, and in the Object properties menu tapping Interactions->Add Interaction->Gaze At->Project-> and selecting the Solar System scene.
- To save time on the rest of the planetary scenes, copy this scene eight more times (tap the Scene pill, select Copy Scene, and give the new scenes names corresponding to the appropriate planets). Then just replace the Mercury model and Wikipedia page with the appropriate model and page.
- When you get to Pluto, you’re done.
That’s it. That’s all it takes to build a ten-scene prototype with beautiful models, interactivity, and both 3D and 2D objects.
Check out the project (running in Play mode) for yourself.
We will be iterating on this project over the next month, trying different interactions and behaviors, layouts, and information architectures.
We also plan to show how to incorporate on-screen elements using prototyping tools like Figma, Invision, and Framer X to complete your mobile AR application.
Thanks!


