


An Easy-to-Follow Step-by-Step Recipe For App Designers
On Friday I shared a video of a wayfinding app I prototyped using Torch and a lot of people asked how it was done. This post explains, step-by-step, how anyone could build a similar prototype in Torch.
There is no coding or special knowledge required. All you need is a iPhone (7 or newer) or iPad (Pro or 2017+) and Torch AR.
The experience demonstrates an app that leads the user from the front lobby of our building to our office, navigating stairs, two right turns, and a left turn, and covering about 150 feet total.
I recorded this all in one take on an iPad and in one project using just Torch (e.g. no outside special effects or video editing software or cloud anchors.)
Assets
I used two 3D assets — the robot guide and dancing storm troopers — and seven variations of the same 2D asset including a welcome card, the checkpoint cards, the bike room card, and the party found card showing you have arrived at our office. Depending on your own environment, you’ll need more or less checkpoint cards.
I chose the flying robot from Sketchfab because I knew it could be placed imprecisely without looking strange. It could float. It also afforded me some flexibility since it had a “front” and a “back.” I could use this orientation to give the guide personality and indicate when it was waiting (facing the camera) and guiding (facing away and moving). The toggle for this is simple to set up too.

I built the text cards in Illustrator. I then exported the artboards as 1024 x 512 PNG’s to Google Drive where I could import them into Torch using the Object Drawer →Browse feature.
The storm trooper model is included at the end as surprise/reward for following experience to the end. I used it because it is animated and can capture attention from far away. Really anything fun or interesting would do.
Execution
Since we don’t yet have proximity triggers in (coming soon, these will trigger interactions as soon as the user gets within the defined distance from the object), I used taps to trigger the interaction that would cause the guide robot to proceed to the next step and for the text cards to disappear in one spot and appear in the next. I thought about the progression from ground to the office and decided it was best to design a series of checkpoints — one at every turn the viewer would need to make.
Experimenting Before Designing
Before I began really designing, I first created a scene where I could sort out my asset sizes and placements.
This is prototyping. Don’t be afraid to experiment on all the little details like placement and interaction behaviors before going into fill design mode.
As it was, I knew I needed to at the very least do the following:
- Experiment with text card size, placement and appearance
- Experiment with interactions that animated the floating robot guide — how would it move fluidly from a waiting state to a guiding state
- Would this be a project with one long scene or many smaller scenes connected together using interactions. Read more about scenes here.
The cards looked best to me when scaled to 2.5 on all axes.
I had originally planned on the interaction of tapping the robot but decided during the quick test to go with tapping the instruction cards. I made a quick edit to the cards and re-exported. Also in that test is where I figured out my simple architecture.
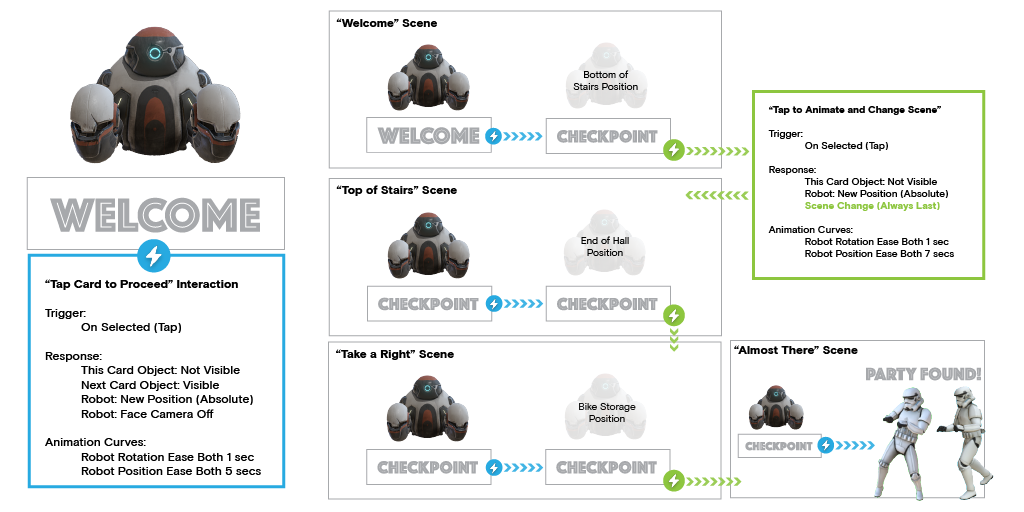
Scene Architecture
Each scene consists of a start checkpoint card and a next checkpoint card. On the next checkpoint interaction, the scene would transition over after the animation curves complete. This gave me the ability to do some nice guiding animations with the robot (between the two checkpoints). It also meant I only needed one scene for every two checkpoints.
Recipe
It requires only four scenes to get the user from the lobby to the front door of the office. The scene plan (or information architecture) for our building is as follows:
- Welcome Scene — guide user up the stairs
- Top of Stairs — guides user to take a right past conference room
- Take a Right — guides user to take a right past bike storage
- Almost There — guides a user to take a left.
Each scene is basically the same except for the surprise ending.
Create each of the scenes you need first (tap the Scene pill →+ Scenes).
Step One: Place Objects in First Scene
Place robot guide model and welcome card for starting point.
- Turn on Face Camera, Y axis for robot guide card. This is found under Object Properties →Face Camera
- Turn on Face Camera, both axes, for the checkpoint card.
- Set Visibility to off — tap object to select it, tap Object Properties →Visibility →toggle off.
Place the next checkpoint card at the next turn or waypoint.
- Turn on Face Camera, both axes, for the next checkpoint card.
- Set Visibility to off — tap object to select it, tap Object Properties →Visibility →toggle off.
Step Two: Set Interactions For Scene
Set up card response — The welcome card will be the object from which we drive the scene interactions. Tap the welcome card object to select it.
- Tap Interactions →On Select Trigger
- Tap the +Object button
- Turn off visibility to hide (Object Properties→ Visibility→ toggle off). This will make the welcome card disappear when tapped.
Add the robot guide response (turn away and float to next checkpoint) to the tap interaction on the checkpoint card.
- While still in interactions for the welcome card, tap the robot guide to select it. This makes the robot guide respond to a tap on the welcome card, becoming the target of this trigger.
- Tap the thumbnail of the robot guide that appears in the Response row.
- Modify the robot guide’s object properties to turn off Face Camera
- Go to absolute position (near next step card).
Add next checkpoint card Response — appear when the welcome checkpoint card is clicked.
- While still in interactions for the welcome card, tap the next checkpoint card. This makes the second checkpoint card a target of an interaction triggered by tapping on the first checkpoint card.
- Modify the next checkpoint card’s properties to turn on visibility.
Edit Response Curves — Response curves control the how fast and how an animation responds to a trigger.
- You can edit response curves for an object by selecting it in the Response row of interactions and tapping Edit Curves.
- Set the response curves so the robot guide position change takes several seconds. Experiment with what works right for the space.
Step Three: Transition to Next Scene/Move to Next Checkpoint
Next Checkpoint Card Interaction — movement through the building to the next checkpoint is accomplished by transitioning to another scene when the user taps the next checkpoint card.
- Select next checkpoint card, then tap Interactions.
- Set the next card response to tap to Visibility off.
- Set the robot guide model response to go to the position where you will set the checkpoint card that begins the next scene.
- Turn off Face Camera.
- Set the response curves so the robot guide position change takes several seconds. Experiment with what works right for the space.
- Set the response to tap to scene change and target the next scene (in this case the Top of Stairs scene. This always happens last after all transitions.
Each successive scene starts with the robot guide and checkpoint card roughly set where the robot ended in last scene. You’ll notice this in the video on the long hallway shots where the next checkpoint “pops” into visibility.
Place the animated storm troopers at the end of the hall where the Torch office is located and presto, I was done.
Pretty simple! Anyone can do this in their office today.
Lessons Learned
One thing I realized towards the end of the test was I should have been more precise with my project anchor. I did not choose a place that would make it easy to get in the same spot and direction every time. It’s a bit of a lighthouse effect where any differences in anchor point placement are amplified the further you move away from that origin. So a few centimeters off at the anchor meant the storm troopers could be a meter off.
You’ll notice this on the last turn where the robot and card aren’t quite to the final hallway. You have to be careful tuning this too tightly because if variance in anchor placement doesn’t cause issues, then ARKit drift could. All in all I was happy with the performance of ARKit and Torch given that the project was running off a single anchor point that had a lot of human-introduced variance with the anchor point. It’s certainly good enough for prototyping.
In the short term, if you wanted really precise and consistent positioning, I would recommend figuring out logical breaks in the experience and make a Torch project for each (assets are easily moved between projects in Torch). That way you can set an anchor at strategic times that will give you the most confidence for precise placement.


