


See your brand in AR with this reliable pipeline for using custom Cinema 4D assets in Torch.
Predictably exporting high-quality assets for use in augmented reality (AR) can be a confusing and time-consuming task even for experienced 3D artists. Scores of 3D model formats, optimized for different lighting and animations, compounded by siloed and code-heavy development environments, creates a minefield of complexity that’s preventing creatives from working with immersive media and spatial computing as deeply as they want to.
With this guide, we will review the variables that make good real-time content, walk through the steps to export an AR-ready model from Cinema 4D, and finally, we’ll use Sketchfab to tune our materials and import the 3D models into Torch. This workflow assumes you are familiar with some basic concepts of 3D modeling and have worked in Cinema 4D. Below I’ll highlight the key settings and requirements you’ll need to include in your modeling workflow to get your assets ready for Torch.
Hi, I’m Spencer Lindsay and I’m a technical artist and 3D content creator with about (good lord) 25 years of experience in real-time 3D. I’ve been developing AR models and content for Torch for the last several months and wanted to help other 3D artists and teams who have established 3D pipelines, to better understand how to prepare their custom and branded models for best performance in Torch apps.
This workflow requires that you download Torch AR and connect your Sketchfab account. Take a minute to get these set up.
If you’re ready to start using custom 3D models in your AR apps–follow me.

Rendering 3D assets in real-time AR
Building geometry and textures for real-time AR has some different rules than you’ll encounter when building 3D assets for pre-rendered content like movies. Instead of taking as much time as it needs to render out an image your phone or tablet needs to render frames out at a rate that is nice to look at and doesn’t hinder interactivity by being jerky and slow.
When developing for AR, artists and designers also have to take into account that the device is rendering frames and running interactivity code at the same time it’s also doing a lot of math to keep the content “stuck” to the real world in front of you. We need to ensure that we build as lightly as possible while still providing the aesthetic that we’re going for.
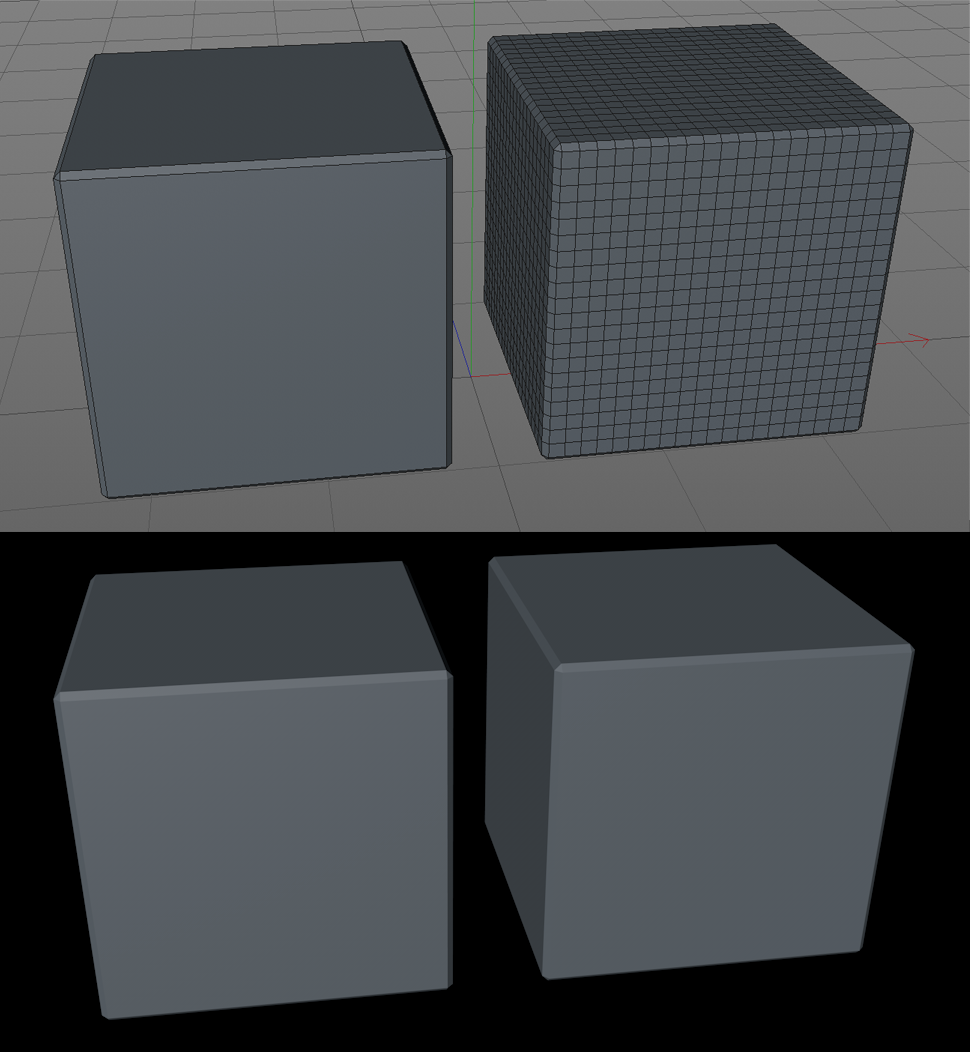
A quick review of polygons & complexity
The cube on the left has 26 polygons (it’s beveled) and the cube on the right has 2,648 polygons. They turn out looking exactly the same, but the cube on the right takes a lot more resources to render.
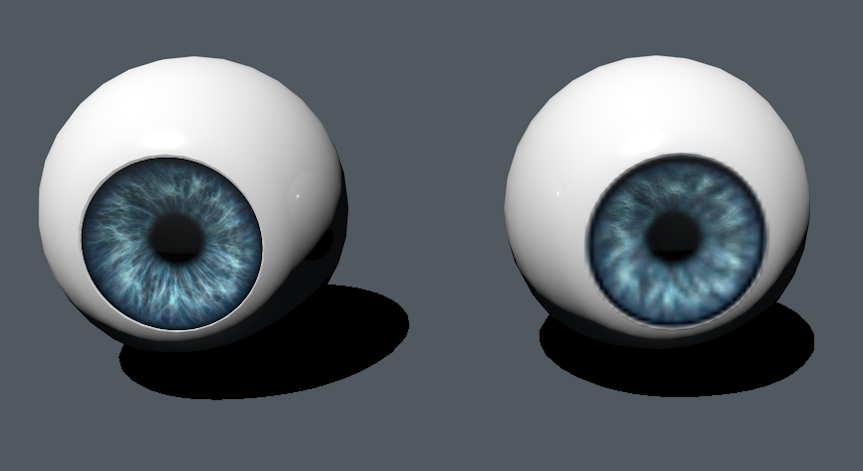
Use only the pixel density you need
Which one of these eyeballs has a 2048 x 2048 px texture and which one is using a 512 x 512 px texture?
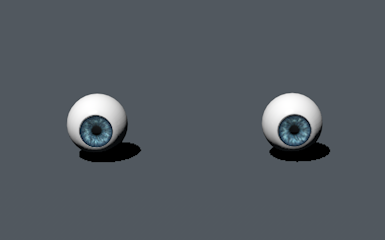
You can’t tell–if you never get closer to this object, you don’t need a larger texture.
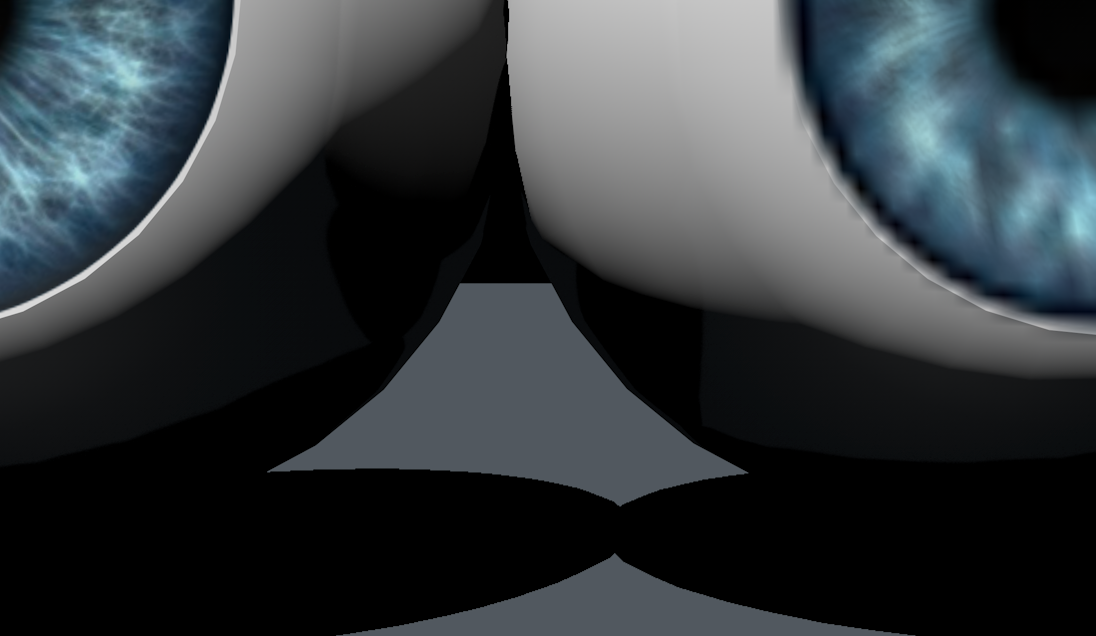
Now zoom in.
The model on the right no longer provides a quality experience. You can see the individual pixels, called “texels” when rendered in 3D, and it looks sloppy. If you are this close to the content, then the larger texture on the left should be your choice.
To help demonstrate our workflow, I built to demonstrate the following steps. I’ve created an animated logotype in Cinema 4D and now we’ll prepare it for use in Torch.

Prepare: Considerations for creating AR models in Cinema 4D
Before we go any further, let’s give you an overview of the workflow that we will follow. In this process you will:
- Create the assets in Cinema 4D
- Export assets from your Cinema 4D file to the FBX format
- Upload the FBX to Sketchfab for material tuning
- Import to Torch with the Sketchfab integration
As you’re building your assets in Cinema 4D, pay close attention to these variables and requirements for exporting a great looking model.
Material type
Use a standard material. Select Create > New Material in the C4D Materials Window. Later, you will change this to PBR once you move the assets over to Sketchfab.
Texture channels
When developing materials for Torch, you will need to keep in mind that you are building for a real-time engine and it will not have some of the material abilities that cinematic renderers have. Therefore, for this workflow you should avoid using layered textures and only focus these texture channels:
- Color (Diffuse+Alpha)
- Specular Amount (Metalness)
- Roughness (Shininess)
- Normal
- Ambient Occlusion
- Emissive
Torch will not understand layered materials so if you’re doing something fancy in your material—stop that. You can bake out the material to a texture and use that if it’s necessary.
Bitmap sizes
Your bitmaps should, as with all real-time applications, be in powers of two (eg 256, 512, 1024, etc). Some engines or assets creation packages allow for non-powers of two texture sizes but your programmers will love you if you just make this a rule for yourself. The current maximum size for textures in Torch is 2048 x 2048px. Larger sizes will just be automatically scaled down on import.
Animation
Torch uses the GLTF format and it accepts several different types of animations. Standard Translation, Rotation, and Scale (TRS) animations, skinned or skeletal animations, and, though they’re not well supported by the industry yet, morph target animations. You’ll see I used a simple rotation in my example.
Learn more about the real-time engine that’s driving Torch behind the scenes, Godot.
Sketchfab to the rescue

Review these pre-flight steps before export
First things first. Make sure you’ve tested your assets and your models are ready for showtime. Since this is where we will start uploading and tuning our creative, ensure that your models are complete and polished for AR before you start these export steps. With each export, walk through this pre-flight checklist for your models.
- Non-animated objects are at 0,0,0 with transforms frozen
- Materials all have the associated textures and colors you want to export
- Textures are no larger than 2048 pixels on a side
- UV’s (mapping coordinates) are applied correctly
- Materials are named so you can access them in Sketchfab
- Animations are either TRS or a skeleton/skin animation. No, you can’t use animated deformers or fancy MoGraph animations
Export Cinema 4D to FBX

First, in Cinema 4D, select the objects that you want to export and choose File > Export > FBX(.fbx). Input your export filename and hit Save.
In the resulting menu, set the following fields:
- Choose FBX Version 7.5(2016) in the top window of this dialog
- Choose Selection Only in the General window
- Choose Tracks and Bake Frames in the Animation window
- Choose Normals in the Geometry window
- Choose Textures and Materials > Embed Textures > Up Axis = Y Axis in the additional window at the bottom.
- Finally, hit OK to save that sucker out to disk–whew.
Import FBX to Sketchfab
Now that we have an FBX with embedded textures, there’s no need to compress it before we upload it to Sketchfab. Even if you’ve exported to another format such as OBJ you can still follow along here. You’ll just need to compress everything, including the supporting files into a ZIP and upload that. But you used FBX as I told you to, right? Excellent.
Log-in and upload
Head over to Sketchfab and sign into your account. If you don’t have an account, make one. It’s free, you need it.
Upload your model and make sure to give is a unique name so you can find it using search in Torch. If you name it “sphere” or “character”, you will be scrolling for a long time.
For documentation lovers. Here’s a host of resources to help you get into the nitty-gritty of uploading to Sketchfab.
Fine-tune the model settings
Once your model is in your Sketchfab library, choose 3D Settings on the right-hand side of the page. For now, we’re only going to be looking at a few of the material attributes for our path to awesome looking content in Torch.
Read more about materials in the Sketchfab help docs.
Set the environment
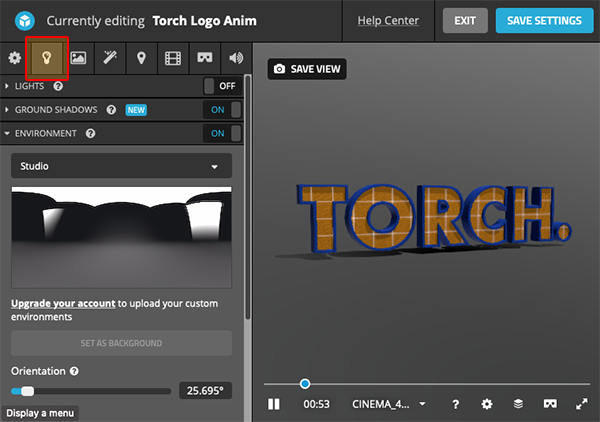
There are a lot of tools allowing you to tweak the overall look of your models and animations in Sketchfab. The main sections are across the top of the window on the left. Click the tab icon that looks like a lightbulb, for lighting–which makes sense.
Since we are using a physically based render (PBR) workflow, the final look of your material will be affected by the color and brightness of the environment map that you’re using. The Environment Map setting is found in the Lighting. The Studio map is the closest environment map in Sketchfab to what is used in Torch.
Get geeky about materials in this two-part PBR object guide. (Here’s Part 1, Here’s Part 2)
Tune the model materials
Now from the same top menu, select the Materials tab. It looks like a landscape, not a material.

This will get you into the Materials tab of the editor. You’re in the right place–go you! For this workflow, these are the properties that you can adjust in Sketchfab that will affect how your models display in Torch:
- Color (Diffuse+Alpha)
- Specular amount (Metalness)
- Roughness (Shininess)
- Normal
- Ambient occlusion
- Emissive
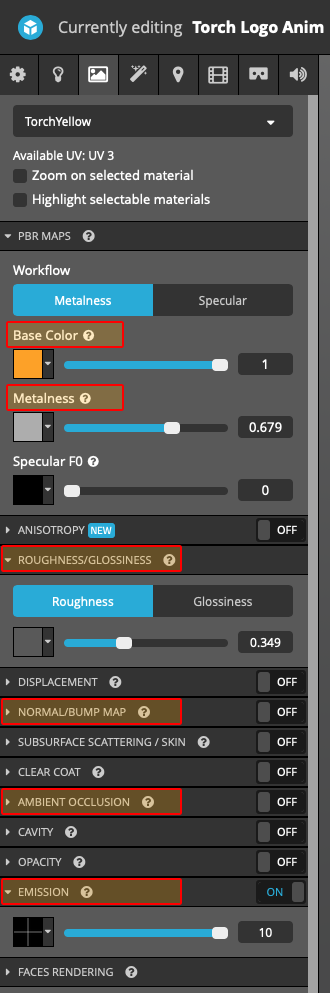
For some reason, sometimes FBX export from Cinema 4D changes the RGB value of the Base Color so check that your colors are correct before you go on. Set your Roughness, Normal, AO, and Emission channels so the materials on the model look right to you. This may take some experimentation. Play with the controls until you get the look you want.
One cool thing about the Sketchfab site is how easy it is to edit textures. Say you’ve changed a texture since uploading your model, you can click on the Texture icon on the left of the Material Attribute and just upload a new one through Manage Texture.
Become a Sketchfab texture pro–get all the details on materials settings.
Save your Sketchfab adjustments
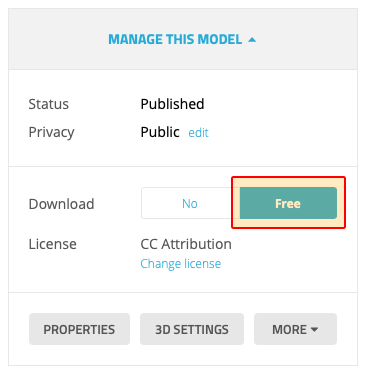
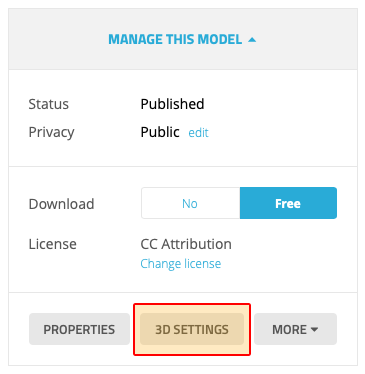
Once you feel great about the environment, lighting, and materials, go ahead and save the file. Save lives in the upper right corner of the Sketchfab window. Make sure you list the model as free to download, so Torch can import your assets. Remember that a great naming convention will save you time and effort later–make sure to use a unique and descriptive title.
Import your models to Torch with the Sketchfab integration
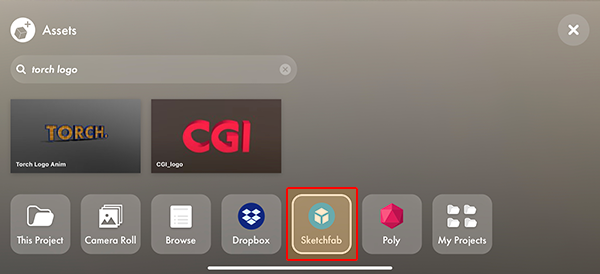
Now with your model perfected and easily searchable, head over to Torch and open the Asset Drawer. Here you will find all of your asset collections. Since we’re using Sketchfab, we’ll tap on the Sketchfab folder and use the search field to look up the name of the model we just saved. When you find the model use a single-finger drag to swipe the model into your scene.
Once you have your custom 3D model in Torch you can verify that your textures and materials are displaying as you expected from the Sketchfab import. If your coordinates are aligned and your materials are rendering as you planned, you’re ready to use these models in your custom AR app.
.png)
“Standards are really great, there are so many to choose from.” - an old colleague from Atari
With so many options for building and displaying 3D models, it can be difficult to reproduce consistent quality models through the entire production pipeline. To develop compelling AR apps, artists need a reliable and repeatable workflow for custom creative. While this workflow is a little circuitous, tuning the model materials in Sketchfab delivers a predictable pipeline for professional, high-quality AR assets your clients will love.
The 3D pipeline is growing and improving every day. As new tools and workflows emerge, we’ll continue to share these tutorials. Let us know what you’d like to hear about next.
Need help with your custom 3D models? Ask the community at the Torch Friends Slack.
About the Author
Spencer Lindsay, principle at Lindsay Digital, has spent the past three decades building video games, art pipelines, and exhibits. He loves technology and uses it to create art and projects for clients. Find him on Twitter at @spencerlindsay.


